DURAN® Measuring Pipette (Graduated Pipette)
Your Location: Main>Consumables>Glassware>DURAN® Measuring Pipette (Graduated Pipette)
DURAN® Measuring Pipette (Graduated Pipette)
Pipettes are manufactured from soda-lime glass.
They are used for the precise measurement and decanting of liquids. Full pipettes only allow filling to specific quantities. Measuring pipettes allow different quantities of liquids to be held and dispensed in portions of the same size or different sizes.
Calibration of the pipettes and burettes is based on the discharged volume (“Ex”) at a reference
temperature of 20°C. This means that the quantities can be withdrawn precisely as shown on the scale as the adhesion of the liquid to the glass has been taken into account during calibration.
Conformity mark DE-M – The conformity mark confirms that the instruments satisfy the requirements of the German weights and measures regulation and the applicable standards.
Batch certificate – Pipettes and burettes in the accuracy class AS have a batch number and are supplied with a batch certificate. This certificate documents the mean value obtained from measuring the batch in question, the standard deviation and the day of issue. The batch certificates can also be retrieved online. The batch number consists of four digits, for example: 18.01. The first two numbers specify the production year, and the following two numbers specify the batch.
Screen print label for pipettes

Explanations
| Batch number, e.g. 15.01 | |
| Conformity mark – verifies compliance with the requirements of the German weights and measures regulation and applicable standards. | |
| 10 | Nominal volume in ml |
| ±0.05ml | Accuracy limit – the deviation of the nominal volume must be no greater than this value which is specified in standards |
| 20°C | Reference temperature – the temperature at which a volumetric instrument must achieve the nominal volume (20°C) stated on it. |
| AS | Accuracy class – denotes the accuracy limit |
| ISO 835 | Standard designation |
| Ex | Calibration based on discharged volume. The quantity of liquid discharged corresponds to the volume specification printed on the product, e.g. pipettes, burettes. The remaining liquid on the walls of the vessel or in the tip is also taken into consideration. |
| Ex + 5 | Waiting time. Allow to discharge and wait 30 seconds. It is important to comply with the specified waiting time to prevent measurement errors |
| Total measurement volume – scale increment is specified below |

DIFFERENCE TYPE OF MEASURING PIPETTES
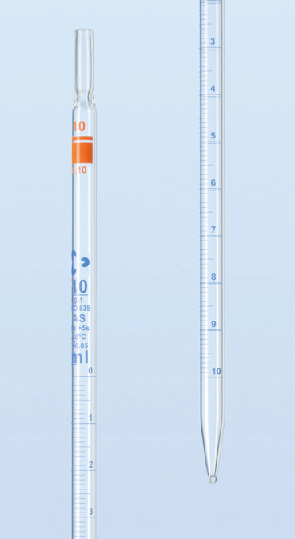
MEASURING PIPETTE TYPE 1
- Drain-out
- zero at top
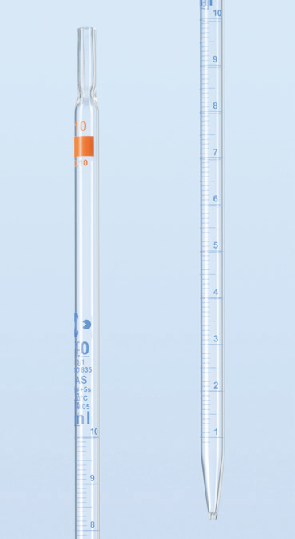
MEASURING PIPETTE TYPE 2
- Blow-out
- zero at bottom
- graduated to tip (total delivery)
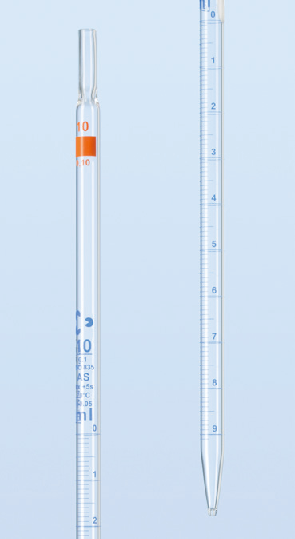
MEASURING PIPETTE TYPE 3
- Blow-out
- zero at top
- graduated to tip (total delivery)


MEASURING PIPETTES TYPE 1
Measuring Pipette from Soda-lime Glass, class AS, type 1
blue printed image, Drain-out, zero at top, with main graduations as circular divisions and cotton plug, with certificate of conformity and With batch certificate
Numbering from the top down. Calibration is based on the poured out volume (“Ex”) at a + 20 °C reference temperature. Due to the scale, variable volumes can be held and then dispensed in the same or differing increments.
Typical applications: accurate measurement and decanting of liquids.
| Cat. No. | Capacity (ml) |
l (mm) |
Accuracy limits (ml) |
Graduation (ml) |
Colour code DIN 12621 |
Pack Unit |
| 233460606 | 0.5 | 360 | 0.006 | 0.01 | 3 x yellow | 12 |
| 233461105 | 1 | 360 | 0.007 | 0.01 | 2 x yellow | 12 |
| 233461602 | 2 | 360 | 0.01 | 0.02 | 2 x black | 12 |
| 233462307 | 5 | 360 | 0.03 | 0.05 | 2 x red | 12 |
| 233462907 | 10 | 360 | 0.05 | 0.1 | 2 x orange | 12 |
| 233463209 | 20 | 360 | 0.1 | 0.1 | 3 x yellow | 6 |
| 233463406 | 25 | 450 | 0.1 | 0.1 | 2 x white | 6 |
| 233463603 | 50 | 450 | 0.2 | 0.2 | 2 x black | 6 |
Measuring Pipette from Soda-lime Glass, class B, type 1
Brown diffusion print, drain-out, zero at top, graduated, with cotton plug
Numbering from the top down. Calibration is based on the poured out volume (“Ex”) at a + 20 °C reference temperature. Due to the scale, variable volumes can be held and then dispensed in the same or differing increments.
Typical applications: accurate measurement and decanting of liquids.
| Cat. No. | Capacity (ml) |
l (mm) |
Accuracy limits (ml) |
Graduation (ml) |
Colour code DIN 12621 |
Remarks | Pack Unit |
| 243430102 | 0.1 | 360 | 0.01 | 0.001 | 3 x green | Non-ISO size, calibrated to contain (“Ex”). | 12 |
| 243430308 | 0.2 | 360 | 0.01 | 0.001 | 3 x blue | Non-ISO size, calibrated to contain (“Ex”). | 12 |
| 243430608 | 0.5 | 360 | 0.008 | 0.01 | 3 x yellow | 12 | |
| 243431107 | 1 | 360 | 0.008 | 0.01 | 2 x yellow | 12 | |
| 243431604 | 2 | 360 | 0.015 | 0.02 | 2 x black | 12 | |
| 243432309 | 5 | 360 | 0.04 | 0.05 | 2 x red | 12 | |
| 243432909 | 10 | 360 | 0.08 | 0.1 | 2 x orange | 12 | |
| 243433408 | 25 | 450 | 0.15 | 0.1 | 2 x white | 12 |
MEASURING PIPETTES TYPE 2
Measuring Pipette from Soda-lime Glass, class AS, type 2
brown inscription, Blow-out, zero at bottom, graduated to tip (total delivery), with main graduations as circular divisions and cotton plug, with certificate of conformity and batch certificate
Numbering: zero at bottom. Calibration is based on the poured out volume (“Ex”) at a + 20 °C reference temperature. Due to the scale, variable volumes can be held and then dispensed in the same or differing increments.
Typical applications: accurate measurement and decanting of liquids.
| Cat. No. | Capacity (ml) |
l (mm) |
Accuracy limits (ml) |
Graduation (ml) |
Colour code DIN 12621 |
Pack Unit |
| 233470607 | 0.5 | 360 | 0.006 | 0.01 | 2 x yellow | 12 |
| 233471106 | 1 | 360 | 0.007 | 0.01 | 1 x yellow | 12 |
| 233471603 | 2 | 360 | 0.01 | 0.02 | 1 x black | 12 |
| 233472308 | 5 | 360 | 0.03 | 0.05 | 1 x red | 12 |
| 233472908 | 10 | 360 | 0.05 | 0.1 | 1 x orange | 12 |
| 233473201 | 20 | 360 | 0.1 | 0.1 | 2 x yellow | 6 |
| 233473407 | 25 | 450 | 0.1 | 0.1 | 1 x white | 6 |
| 233473604 | 50 | 450 | 0.2 | 0.2 | 1 x black | 6 |
Measuring Pipette from Soda-lime Glass, class AS, type 2
blue inscription, Blow-out, zero at bottom, graduated to tip (total delivery), with main graduations as circular divisions and cotton plug, with certificate of conformity and batch certificate
Numbering: zero at bottom. Calibration is based on the poured out volume (“Ex”) at a + 20 °C reference temperature. Due to the scale, variable volumes can be held and then dispensed in the same or differing increments.
Typical applications: accurate measurement and decanting of liquids.
| Cat. No. | Capacity (ml) |
l (mm) |
Accuracy limits (ml) |
Graduation (ml) |
Colour code DIN 12621 |
Pack Unit |
| 233480608 | 0.5 | 360 | 0.006 | 0.01 | 2 x yellow | 12 |
| 233481107 | 1 | 360 | 0.007 | 0.01 | 1 x yellow | 12 |
| 233481604 | 2 | 360 | 0.01 | 0.02 | 1 x black | 12 |
| 233482309 | 5 | 360 | 0.03 | 0.05 | 1 x red | 12 |
| 233482909 | 10 | 360 | 0.05 | 0.1 | 1 x orange | 12 |
| 233483202 | 20 | 360 | 0.1 | 0.1 | 2 x yellow | 6 |
| 233483408 | 25 | 450 | 0.1 | 0.1 | 1 x white | 6 |
| 233483605 | 50 | 450 | 0.2 | 0.2 | 1 x black | 6 |
MEASURING PIPETTES TYPE 3
Measuring Pipette from Soda-lime Glass, class AS, type 3
Brown diffusion print, blow-out, zero at top, with ring graduations, with cotton plug, with batch certificate and certificate of conformity
Numbering from the top down. Due to the scale, variable volumes can be held and then dispensed in the same or differing increments.
Typical applications: accurate measurement and decanting of liquids.
| Cat. No. | Capacity (ml) |
l (mm) |
Accuracy limits (ml) |
Graduation (ml) |
Colour code DIN 12621 |
Pack Unit |
| 243451109 | 1 | 360 | 0.007 | 0.01 | 1 x yellow | 12 |
| 243451709 | 2 | 360 | 0.01 | 0.02 | 1 x black | 12 |
| 243452302 | 5 | 360 | 0.03 | 0.05 | 1 x red | 12 |
| 243452902 | 10 | 360 | 0.05 | 0.1 | 1 x orange | 12 |
| 243453401 | 25 | 450 | 0.1 | 0.1 | 1 x white | 12 |
Measuring Pipette from Soda-lime Glass, class AS, type 3
blue inscription, Blow-out, zero at top, graduated to tip (total delivery), with main graduations as circular divisions and cotton plug, with certificate of conformity and batch certificate
Numbering from the top down. Calibration is based on the poured out volume (“Ex”) at a + 20 °C reference temperature. Due to the scale, variable volumes can be held and then dispensed in the same or differing increments.
Typical applications: accurate measurement and decanting of liquids.
| Cat. No. | Capacity (ml) |
l (mm) |
Accuracy limits (ml) |
Graduation (ml) |
Colour code DIN 12621 |
Pack Unit |
| 233490609 | 0.5 | 360 | 0.006 | 0.01 | 2 x yellow | 12 |
| 233491108 | 1 | 360 | 0.007 | 0.01 | 1 x yellow | 12 |
| 233491605 | 2 | 360 | 0.01 | 0.02 | 1 x black | 12 |
| 233492301 | 5 | 360 | 0.03 | 0.05 | 1 x red | 12 |
| 233492901 | 10 | 360 | 0.05 | 0.1 | 1 x orange | 12 |
| 233493203 | 20 | 360 | 0.1 | 0.1 | 2 x yellow | 6 |
| 233493409 | 25 | 450 | 0.1 | 0.1 | 1 x white | 6 |
| 233493606 | 50 | 450 | 0.2 | 0.2 | 1 x black | 6 |
Measuring Pipette from soda-lime glass, class B, type 3
Brown diffusion print, blow-out, zero at top, graduated, with cotton plug
Numbering from the top down. Calibration is based on the poured out volume (“Ex”) at a + 20 °C reference temperature. Due to the scale, variable volumes can be held and then dispensed in the same or differing increments.
Typical applications: accurate measurement and decanting of liquids.
| Cat. No. | Capacity (ml) |
l (mm) |
Accuracy limits (ml) |
Graduation (ml) |
Colour code DIN 12621 |
Remarks | Pack Unit |
| 243440103 | 0.1 | 360 | 0.01 | 0.001 | 2 x green | calibrated to contain (“Ex”). | 12 |
| 243440309 | 0.2 | 360 | 0.01 | 0.001 | 2 x blue | calibrated to contain (“Ex”). | 12 |
| 243440609 | 0.5 | 360 | 0.008 | 0.01 | 2 x yellow | 12 | |
| 243441108 | 1 | 360 | 0.008 | 0.01 | 1 x yellow | 12 | |
| 243441605 | 2 | 360 | 0.015 | 0.02 | 1 x black | 12 | |
| 243442301 | 5 | 360 | 0.04 | 0.05 | 1 x red | 12 | |
| 243442901 | 10 | 360 | 0.08 | 0.1 | 1 x orange | 12 | |
| 243443409 | 25 | 450 | 0.15 | 0.1 | 1 x white | 12 |